iOS Custom Presentation & Transition (3) 〜Custom Transition〜
はじめに
iOS Custom Presentation & Transition (1) 〜コード一行もない編〜 - your3i’s blog
iOS Custom Presentation & Transition (2) 〜UIPresentationControllerでカスタムモーダルを作る〜 - your3i’s blog
1は作るものの紹介と大体の概念を説明し、2はpresentation controllerを利用してSemiModalの実装を説明した。今回は引き続き、Custom transitionの実装方法を簡単に説明。
なぜCustom transitionを実装する必要がある
1で作るものを紹介したと思うが、モーダルを出すときは下からslide inして、閉じるときは下にslide outするように。そして、モーダルをdragしても閉じれるように。
前回(2)はここまで作った:
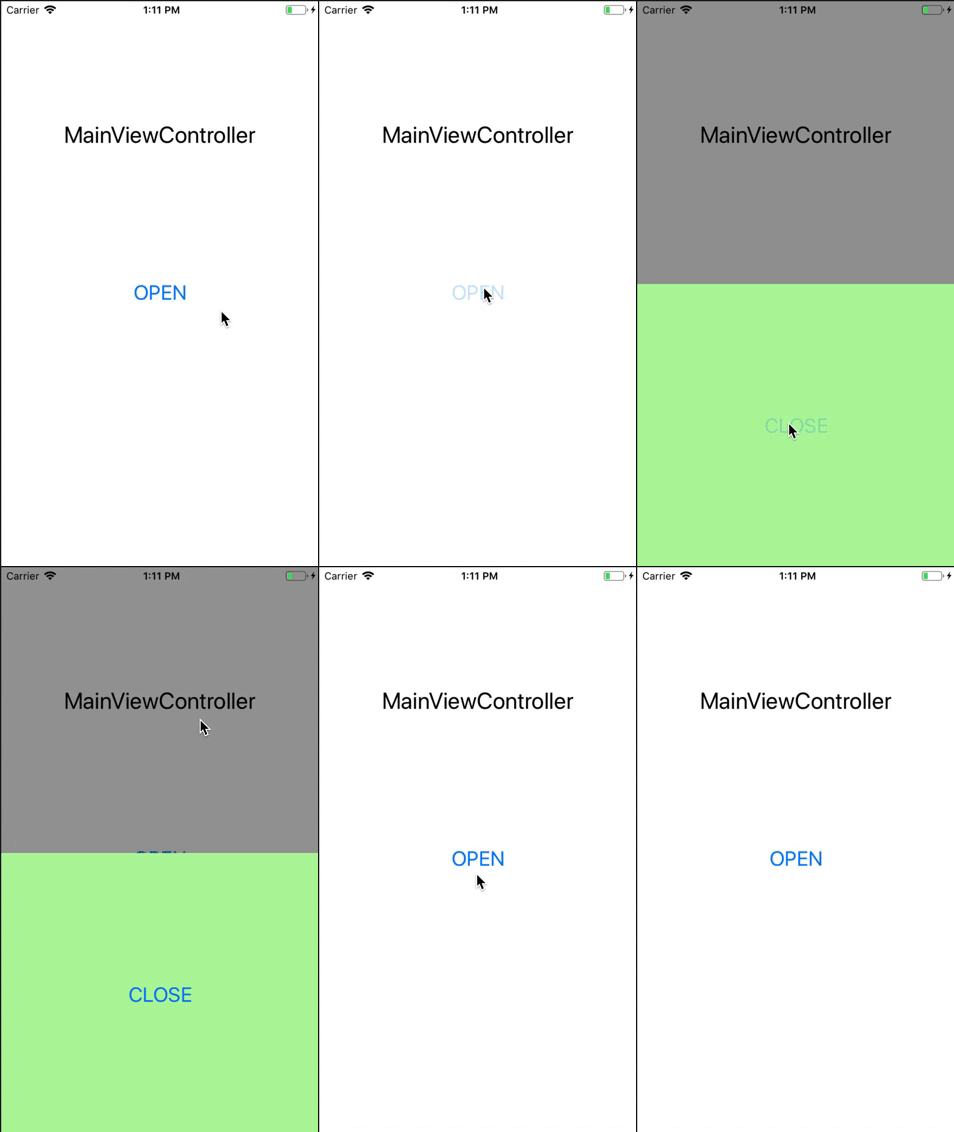
modalTransitionStyleをstoryboardでcover verticalに設定してあるから、slide in slide outの要件はもうすでに満たしてる。なんかcustom transition やらなくてもいいじゃない?
でも実は、dragして閉じれることを作るには、UIPercentDrivenInteractiveTransitionというクラスを利用する必要がある。これのオブジェクトが使われる前提としてcustom transition animatorを作る必要がある。
A percent-driven interactive transition object relies on a transition animator delegate—a custom object that adopts the UIViewControllerAnimatedTransitioning protocol—to set up and perform the animations.
そのため、drag dismiss を実現するために、すでにslide outできるようにしてるけど、それぽい挙動になるcustom transitionを作らなきゃいけない。
下からslide outするcustom transitionの実装
CustomDismissAnimatorを作る
UIViewControllerAnimatedTransitioningをadoptしたクラスCustomDismissAnimatorを作成。今回はdismissのときだけ、custom transitionにしたいから、dismiss専用animatorを作った。Animatorという名前は、別の名前にしてもいいけど、transitionのanimationを定義するクラスだから、animatorにした。
final class CustomDismissAnimator: NSObject, UIViewControllerAnimatedTransitioning {
}
UIViewControllerAnimatedTransitioningのメソッドをimplementしてないから、エラーが出ると思う。
まず、transition アニメーションの時間を返さなきゃいけない。
final class CustomDismissAnimator: NSObject, UIViewControllerAnimatedTransitioning {

    func transitionDuration(using transitionContext: UIViewControllerContextTransitioning?) -> TimeInterval {
        return 0.2
    }
}
そして、transitionはどんなアニメーションで行われるのかを教えなきゃいけない。
final class CustomDismissAnimator: NSObject, UIViewControllerAnimatedTransitioning {

    func transitionDuration(using transitionContext: UIViewControllerContextTransitioning?) -> TimeInterval {
        return 0.2
    }

    func animateTransition(using transitionContext: UIViewControllerContextTransitioning) {
    // とりあえず、何もせずtransition終わったようを教えてあげよう
    transitionContext.completeTransition(true)
    }
}
CustomDismissAnimatorを使われるようにする
DetailsViewControllerにUIViewControllerTransitioningDelegateの以下の方法をadoptする。dismissするときこのクラスが定義したアニメーションを使ってくれという意味だ。
    func animationController(forDismissed dismissed: UIViewController) -> UIViewControllerAnimatedTransitioning? {
        return CustomDismissAnimator()
    }
動きをみてみると、DetailsViewControllerを閉じるときしゅっと消えるようになった。これはアニメーションちゃんと作ってなかったからだ、でもこれで、CustomDismissAnimatorが使われていることがわかる。

transitionのアニメーション
正直いうとここはまだそんなに理解してないんだ。
これってなに?になるものがいくつかあって、一応自分現状の理解で説明すると。
- UIViewControllerContextTransitioningのtransitionContext
- transitionアニメーションが行われる場所としての箱みたいなもの。紙芝居のあの箱みたいな。
- transitionContext.viewController(forKey: .from)
- fromとtoのそれぞれのview controllerがある。今回はDetailsViewControllerオブジェクトからMainViewControllerオブジェクトに遷移するため、fromのview controllerはDetailsViewControllerオブジェクト。
- fromViewの位置の計算
- 前のステップのgifのように、detailViewControllerのviewであるfromViewはシュッと消えるのように、transitionContextの中で、今fromViewのtransition始まるときの位置と終わるときの位置が一緒。目標はtransitionが終わるとき、fromViewがy軸で下から消えるように下から、改めてfromViewのfinalFrameを計算しておく。
- transitionContext.completeTransition
- こっちからcompleteTransitionを指示しなきゃ、transitionContext自分からtransitionを終えることができないみたい。そのため、animationが完了したあと、ちゃんと教える必要がある。そうしないと、transitionContextにはcontainerViewがあって、そのviewが画面上にぞっと残ってて、下のMainViewControllerオブジェクトを触ることができなくなる。
って、コードはこうなる:
    func animateTransition(using transitionContext: UIViewControllerContextTransitioning) {
        // DetailsViewControllerオブジェクトを取る
        guard let fromViewController = transitionContext.viewController(forKey: .from),
            let fromView = transitionContext.view(forKey: .from) else {
            transitionContext.completeTransition(true)
            return
        }

        // DetailsViewControllerオブジェクトの最終位置の計算
        var fromFinalFrame = transitionContext.finalFrame(for: fromViewController)
        let newFinalOrigin = CGPoint(x: fromFinalFrame.origin.x, y: UIScreen.main.bounds.height)
        fromFinalFrame.origin = newFinalOrigin

        // アニメーション
        let duration = transitionDuration(using: transitionContext)
        UIView.animate(
            withDuration: duration,
            animations: {
                fromView.frame = fromFinalFrame
            },
            completion: { _ in
                // transitionキャンセルされたかどうか次第で、transitionを完了する
                let success = !transitionContext.transitionWasCancelled
                transitionContext.completeTransition(success)
            }
        )
    }
実装完了
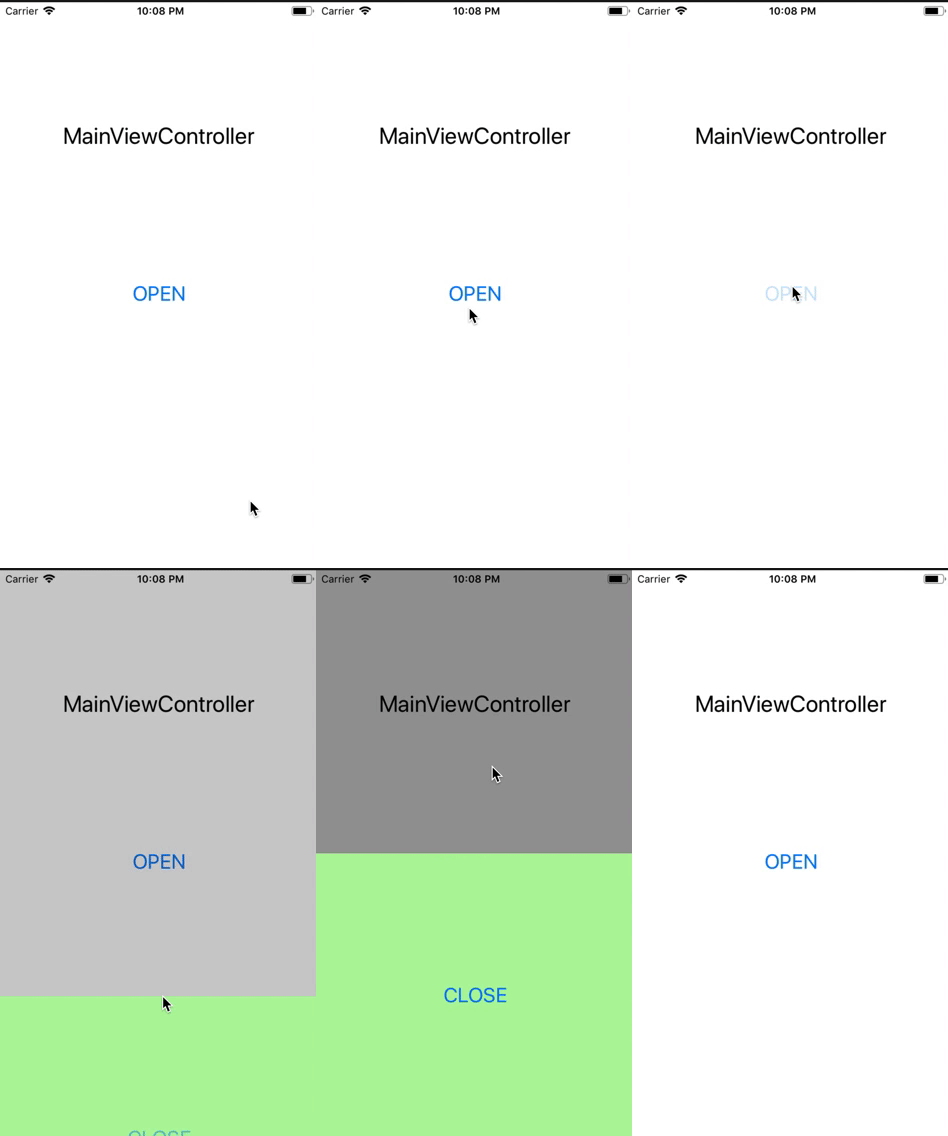
なにも変わってないじゃん〜 はい、そうですw
でもこれで!interactive transitionが作れるようになる!
次回で話す。
おわりに
transitionContextについてちゃんと説明することができなかった🤦♀️
でもanimateTransitionの中は、色々おしゃれなアニメーション作れるところだから、よく理解した方が良さそう。今度機会があったら、おしゃれなアニメーションを作ってみてそして書く。
記事のまとめ
iOS Custom Presentation & Transition (1) 〜コード一行もない編〜 - your3i’s blog
iOS Custom Presentation & Transition (2) 〜UIPresentationControllerでカスタムモーダルを作る〜 - your3i’s blog
iOS Custom Presentation & Transition (3) 〜Custom Transition〜 - your3i’s blog
iOS Custom Presentation & Transition (4) 〜Interactive Transition〜 - your3i’s blog
CodingKeyとKeyDecodingStrategyのconvertFromSnakeCase一緒に使う
概要
iOS9からAPIのリスポンスとアプリモデルの間のマッピング用のCodable(Decodable + Encodable = Codable)が使えるようになった。CodingKeyはdecodeとencodeに必要なキーを定義するとき使うプロトコルである。そして、convertFromSnakeCaseはdecodeするとき、リスポンスのデータのキーをsnake-caseからcamel-caseに変換してくれるツールみたいなもの。
両方一緒に使ってみたとき、よくわからないがこけるケースがあった。記録。
間違ってる例
GroceryProductのproductIDとproductNameを以下のようにjsonからdecodeする。convertFromSnakeCaseがいい感じにやってくれると思ったが…
let data = """
{
    "product_id": "777",
    "product_name": "Banana"
}
""".data(using: .utf8)!

struct GroceryProduct: Decodable {
    var productID: String
    var productName: String
}

let decoder = JSONDecoder()
decoder.keyDecodingStrategy = .convertFromSnakeCase
let result = try decoder.decode(GroceryProduct.self, from: data)
print(result)
こんなエラーが起きた:
No value associated with key CodingKeys(stringValue: \"productID\", intValue: nil) (\"productID\"), converted to product_id.
二つの間違ってるところ
問題1 convertFromSnakeCaseはproduct_idをproductIdに変換するのだ
ドキュメントを読んだら、こう書いてあった↙︎
Note
The JSONDecoder.KeyDecodingStrategy.convertFromSnakeCase strategy can't infer capitalization for acronyms or initialisms such as WYSIWYG or URI.
例えば、base_uri → Converts to: baseUri
だから、product_id → Converts to: productId
修正
そういう訳か。じゃproductIDのsnack_case変換を諦めて、Customキーを指定すればいいだろう?と思って、CodingKeyを使ってGroceryProductをこう修正した。
struct GroceryProduct: Decodable {
    var productID: String
    var productName: String

    private enum CodingKeys: String, CodingKey {
        case productID = "product_id" // キーを指定
        case productName
    }
}
またエラー!!!
No value associated with key CodingKeys(stringValue: \"product_id\", intValue: nil) (\"product_id\").
このエラーは本当に意味わからなかった…
問題2 convertFromSnakeCaseを本当に理解した?
そのdeocdeの順番は:
① convertFromSnakeCaseが使われる → JSONのキーをsnake-caseからcamel-caseに変換
② CodingKeyが使われる → 指定されたキーでそれぞれの値を取る
そのため、CodingKeyが使われる時点でJSONのproduct_idはもうproductIdになった。
修正
let data = """
{
    "product_id": "777",
    "product_name": "Banana"
}
""".data(using: .utf8)!

struct GroceryProduct: Decodable {
    var productID: String
    var productName: String

    private enum CodingKeys: String, CodingKey {
        case productID = "productId" // キーを指定
        case productName
    }
}

let decoder = JSONDecoder()
decoder.keyDecodingStrategy = .convertFromSnakeCase
let result = try decoder.decode(GroceryProduct.self, from: data)
print(result)
ようやく直った😭
Output:
GroceryProduct(productID: "777", productName: "Banana")
まとめ
注意
CodingKeyとconvertFromSnakeCaseを一緒に使うとき、CodingKeyでdecodeするときキーはもうcamel-caseに変換されたことに注意。
感想
convertFromSnakeCaseを設定した上で、Customキーを指定することもあるあるだろう。しかし、Customキーを指定するとき、JSONのキーだけじゃなく、convertFromSnakeCaseの変換も考慮する必要があり、謎の曲がりがあってわかりづらい。二つの実装が離れてる場合、バグが生みそう。
だから一緒に使わない方がいいと思った。
どっちかというと、CodingKeyが自由度高いし、単純でわかりやすい。convertFromSnakeCaseはサーバー側とキーの約束をしっかりして、Customキーを使う必要がない!の環境で使うと便利かも。笑。
iOS Custom Presentation & Transition (2) 〜UIPresentationControllerでカスタムモーダルを作る〜
UIPresentationControllerの役割
presentation controllerオブジェクトは、presented view controllerを管理する役割を持ってる。そして、presented view controller表示されてるときのスタイルを指定するなど。
ドキュメントに書いたやること
Set the size of the presented view controller.
Add custom views to change the visual appearance of the presented content.
Supply transition animations for any of its custom views.
Adapt the visual appearance of the presentation when changes occur in the app’s environment.
翻訳すると
- presented view controllerのサイズを設定
- 表示するときほかにカスタムビューが必要だったら追加
- transitionが行われるときに、そのカスタムビューに必要なアニメーションを追加
- アプリの環境が変わるとき、その変化に応じてpresentationを調整
これでわかること
前回で書いた通り、今回は半モーダルでdetailsViewControllerを出すのを作ってみる。
前回のリンク:
iOS Custom Presentation & Transition (1) 〜コード一行もない編〜 - your3i’s blog
それを作るとき:
- detailsViewControllerの表示するサイズはpresentation controllerが決める
- detailsViewControllerの後ろのdimming viewはpresentation controllerが追加する
- 遷移するときのそのdimming viewのアニメーションもpresentation controllerが追加する
- dimming viewのタップイベントもpresentation controllerが追加する
- 端末の回転とか起きたとき、dimming viewとpresented viewのサイズなどはpresentation controllerが調整
(自分は、presentation controllerを使わず、presented view controllerで全部やってて、変な実装をしたことがある😂)
カスタムUIPresentationController
カスタムUIPresentationControllerの適用
まず、空でもいいから、UIPresentationControllerを継承したCustomPresentationControllerを作る。
import UIKit

class CustomPresentationController: UIPresentationController {

    override init(presentedViewController: UIViewController, presenting presentingViewController: UIViewController?) {
        super.init(presentedViewController: presentedViewController, presenting: presentingViewController)
    }
}
そして、カスタムUIPresentationController使われるように、detailsViewControllerのmodalPresentationStyleを.customに設定し、CustomPresentationControllerオブジェクトをdetailsViewControllerに渡すUIViewControllerTransitioningDelegateのオブジェクトも設定する。
今回はdetailsViewController自分でUIViewControllerTransitioningDelegateにするようにする。
class DetailsViewController: UIViewController, UIViewControllerTransitioningDelegate {

    ...

    static func viewController() -> DetailsViewController {
        let storyboard = UIStoryboard(name: "Main", bundle: nil)
        let viewController = storyboard.instantiateViewController(withIdentifier: "DetailsViewController") as! DetailsViewController
        viewController.modalPresentationStyle = .custom
        viewController.transitioningDelegate = viewController
        return viewController
    }

    ...

    // MARK: - UIViewControllerTransitioningDelegate

    func presentationController(forPresented presented: UIViewController, presenting: UIViewController?, source: UIViewController) -> UIPresentationController? {
        return CustomPresentationController(presentedViewController: presented, presenting: presenting)
    }
}
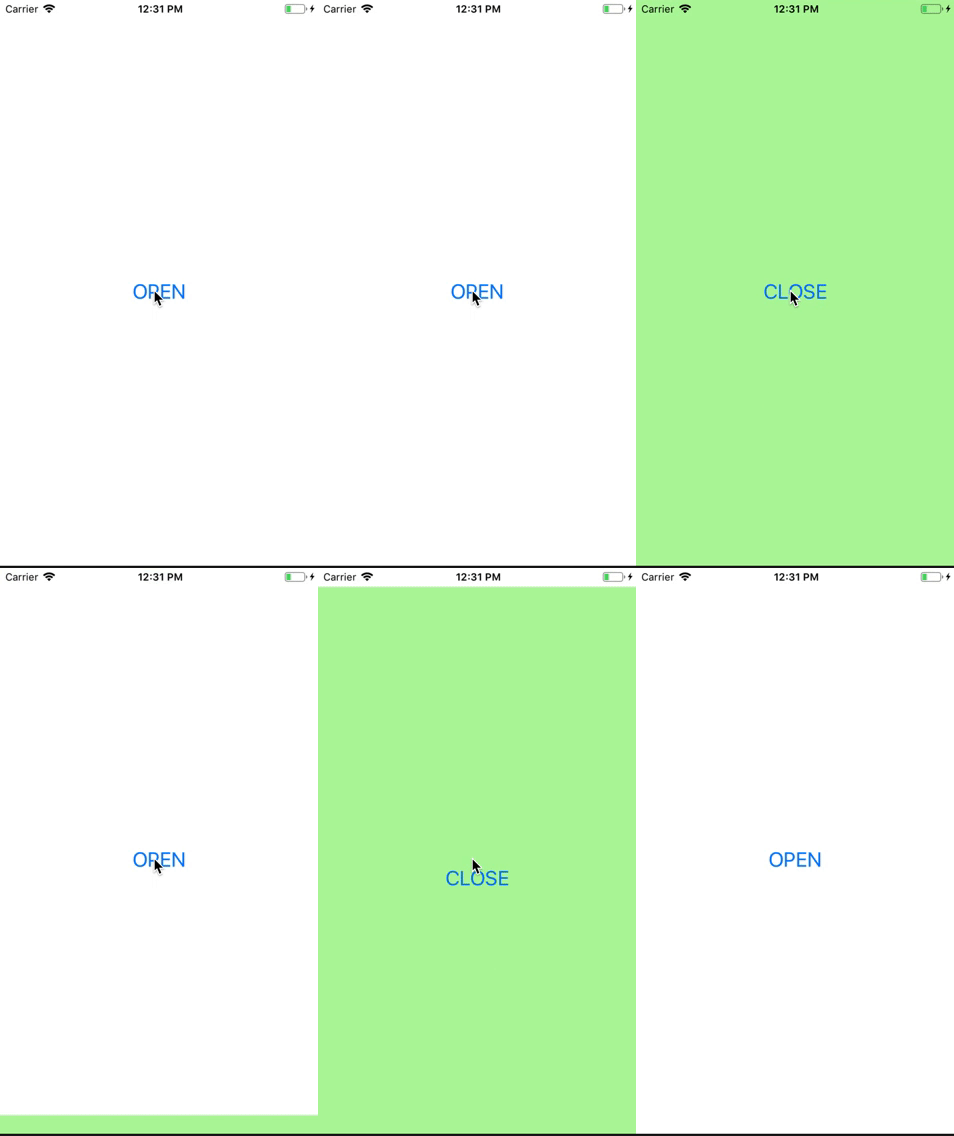
効果をみてみよう:
今はただ空で継承したから、挙動の変化はまだない。
半画面にする
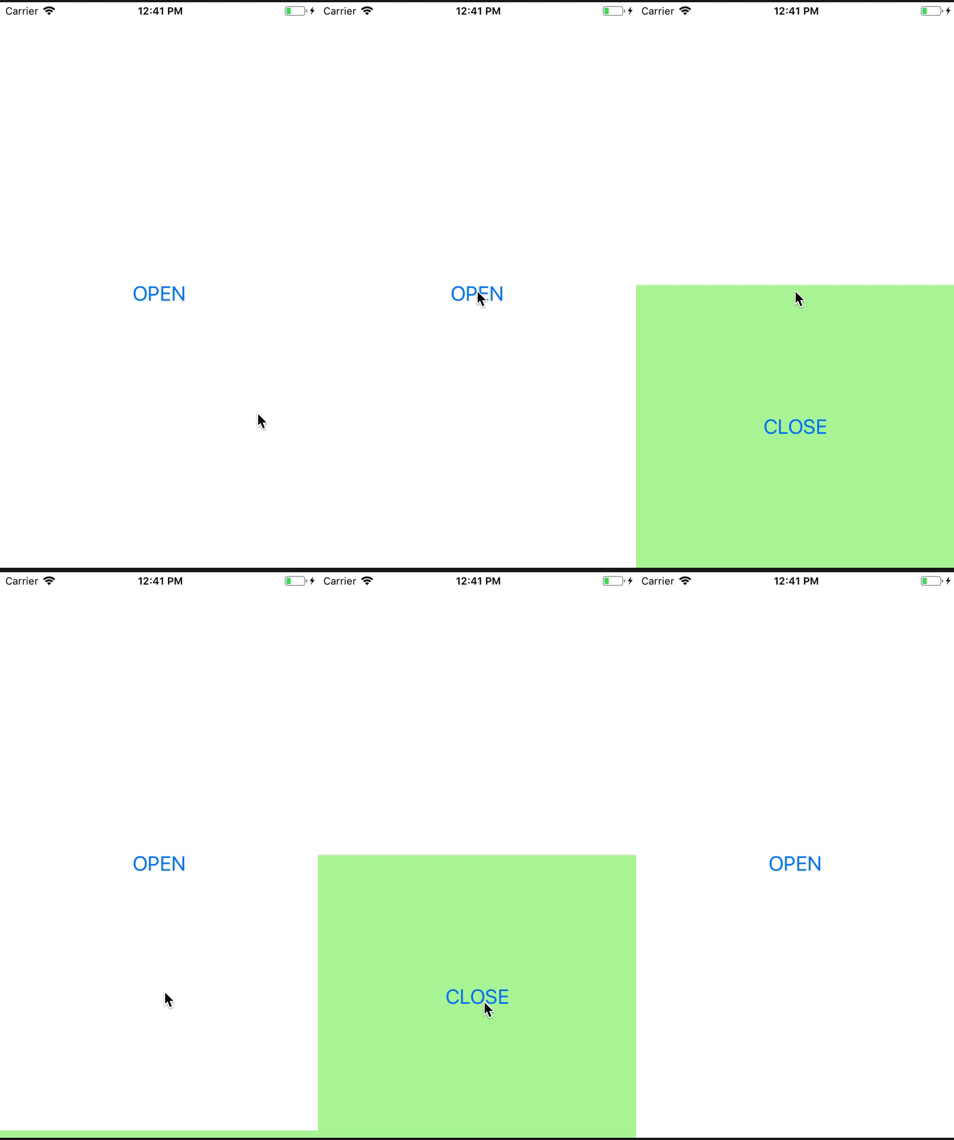
CustomPresentationControllerのframeOfPresentedViewInContainerViewをoverride。
containerViewは名前通り、presentationはこのビューの中で行われる。
override var frameOfPresentedViewInContainerView: CGRect {
    guard let containerView = containerView else {
        return .zero
    }

    let rect = CGRect(x: 0, y: containerView.bounds.height / 2.0, width: containerView.bounds.width, height: containerView.bounds.height / 2.0)
    return rect
}
効果をみてみよう:
DimmingViewを追加
このステップで、画面の残りの部分をoverlayするdimming viewを追加する。
まずdimming viewを作る。
class CustomPresentationController: UIPresentationController {

    private var dimmingView: UIView!

    override init(presentedViewController: UIViewController, presenting presentingViewController: UIViewController?) {
        super.init(presentedViewController: presentedViewController, presenting: presentingViewController)
        setupDimmingView()
    }

    private func setupDimmingView() {
        let view = UIView()
        view.backgroundColor = UIColor.black.withAlphaComponent(0.4)   //透明度を指定
        dimmingView = view
    }

    ...
}
presentation transition開始するときにdimming viewをsubviewとして追加。
    override func presentationTransitionWillBegin() {
        guard let containerView = containerView else {
            return
        }

        dimmingView.frame = containerView.bounds
        containerView.addSubview(dimmingView)
    }

    override func presentationTransitionDidEnd(_ completed: Bool) {
        // もしpresentation transition失敗した場合、detailsViewControllerを出せなかったから、dimming viewもremoveする
        if !completed {
            dimmingView.removeFromSuperview()
        }
    }
detailsViewControllerがdismissされたら、dismiss transitionが行われる。dismiss transition成功に終わったら、dimming viewもremoveする
    override func dismissalTransitionDidEnd(_ completed: Bool) {
        if completed {
            dimmingView.removeFromSuperview()
        }
    }
効果をみてみよう:

DimmingViewにアニメーションをつける
前のステップで、dimmingViewが追加れたかけど、出し方がちょっと微妙だね。このステップで、DimmingViewにアニメーションをつける。
表示するとき:
presentationTransitionWillBeginにアニメーションコードの追加。
    override func presentationTransitionWillBegin() {
        guard let containerView = containerView else {
            return
        }

        dimmingView.frame = containerView.bounds
        containerView.addSubview(dimmingView)

        // アニメーション→表示
        dimmingView.alpha = 0.0
        if let coordinator = presentedViewController.transitionCoordinator {
            coordinator.animate(
                alongsideTransition: { [weak self] _ in
                    self?.dimmingView.alpha = 1.0
                }, completion: nil)
        } else {
            dimmingView.alpha = 1.0
        }
    }
非表示するとき:
dismissalTransitionWillBeginを新しくoverrideして、そこに非表示のアニメーションを追加。
    override func dismissalTransitionWillBegin() {
        // アニメーション → 非表示
        if let coordinator = presentedViewController.transitionCoordinator {
            coordinator.animate(
                alongsideTransition: { [weak self] _ in
                    self?.dimmingView.alpha = 0.0
                }, completion: nil)
        } else {
            dimmingView.alpha = 0.0
        }
    }
効果をみてみよう:
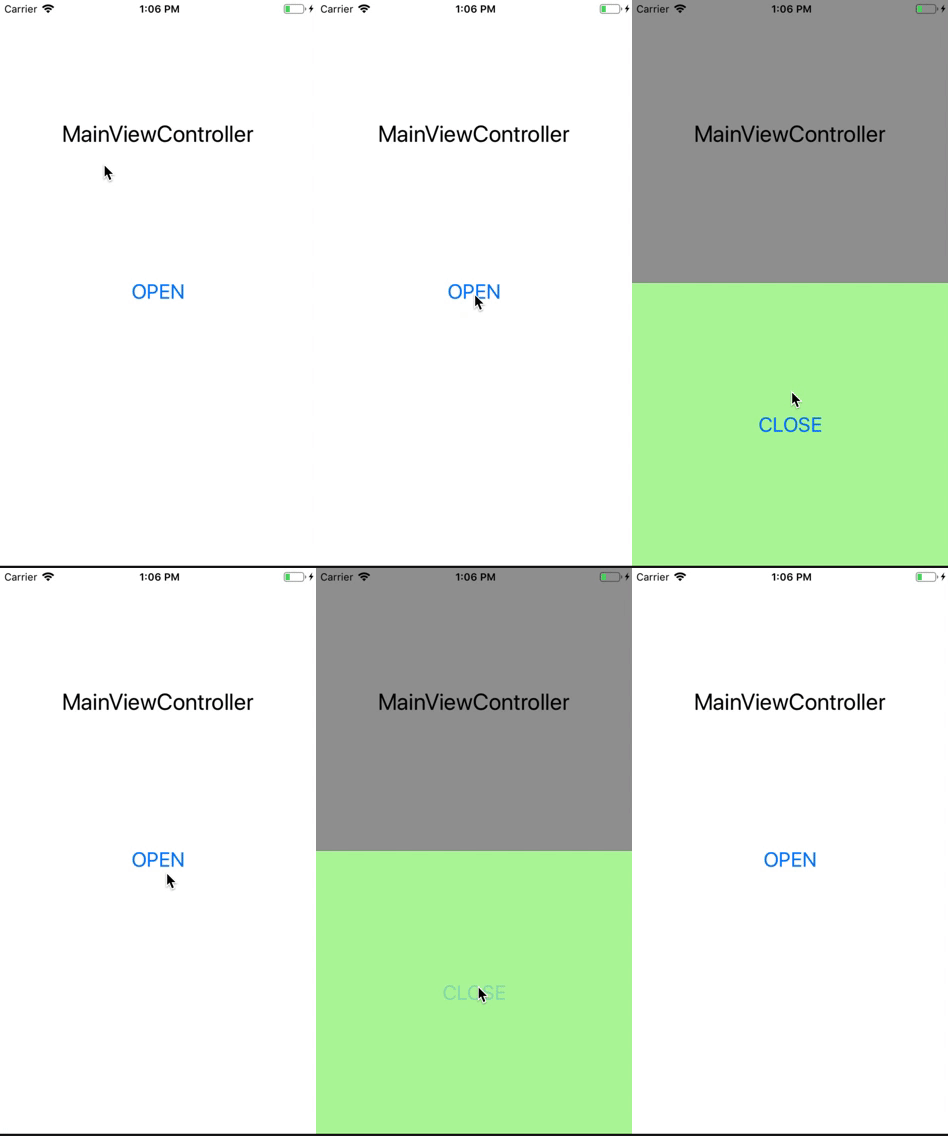
タップしてdetailsViewControllerを閉じる
これは!もう簡単〜dimming viewにtap gesture recognizerを追加すればいい。
    private func setupDimmingView() {
        let view = UIView()
        view.backgroundColor = UIColor.black.withAlphaComponent(0.4)
        dimmingView = view

        // tap gesture recognizer を追加
        let tapGesture = UITapGestureRecognizer(target: self, action: #selector(handleTap(_:)))
        dimmingView.addGestureRecognizer(tapGesture)
    }

    @objc func handleTap(_ recognizer: UITapGestureRecognizer) {
        presentedViewController.dismiss(animated: true, completion: nil)
    }
完成!!!

まとめ
UIPresentationControllerを使ってカスタムモーダルを作ってみた。ほかのかっこいいpresentation styleも色々できそうな気がしてきた。
次回はカスタムtransitionを書く。
記事のまとめ
iOS Custom Presentation & Transition (1) 〜コード一行もない編〜 - your3i’s blog
iOS Custom Presentation & Transition (2) 〜UIPresentationControllerでカスタムモーダルを作る〜 - your3i’s blog
iOS Custom Presentation & Transition (3) 〜Custom Transition〜 - your3i’s blog
iOS Custom Presentation & Transition (4) 〜Interactive Transition〜 - your3i’s blog
iOS Custom Presentation & Transition (1) 〜コード一行もない編〜
作りたいもの
MainViewControllerとDetailsViewControllerがある。
最初はMainViewControllerが表示されてる状態。
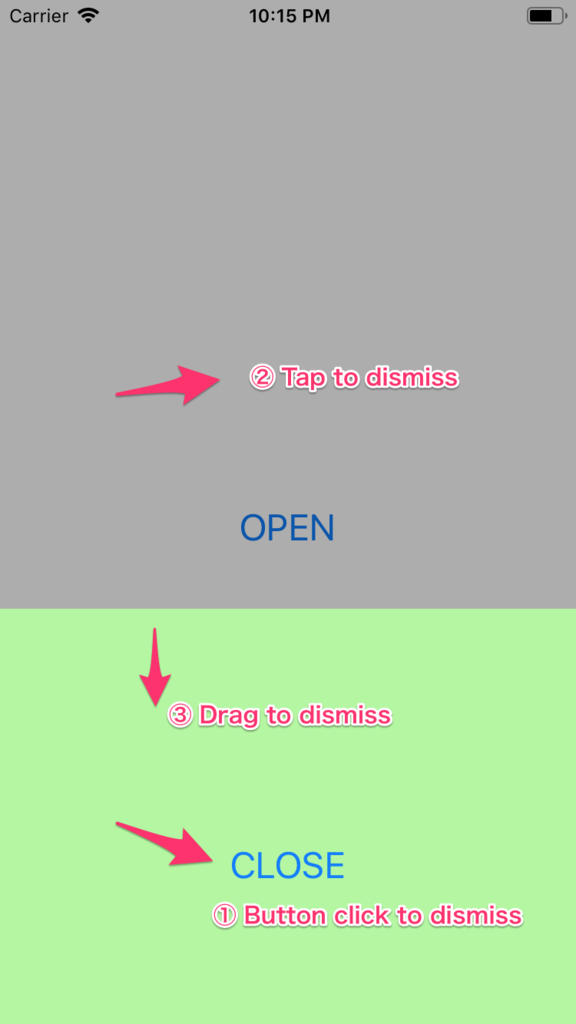
MainViewControllerからDetailsViewControllerをモーダルで下からslide inして出して、MainViewControllerの上に表示させる。DetailsViewControllerは画面の下の一部だけを使ってて、他の部分は半透明でMainViewControllerの画面が表示されてるようにする。
そして、DetailsViewControllerを閉じる方法として、DetailsViewController画面で何かしら操作して閉じる。もしくは半透明の画面部分でタップして閉じる。さらに、一番楽しいの、DetailsViewControllerの画面部分をDragして閉じる。
イメージはこんなもの⤵️
どう作るの?分解するのだ
こういうUIは良く見かけると思う。一瞬で一連のアニメーションで終わってるから、ぼんやりしてこれらは一つのControllerで実装されたものに見えがち。
実は各部分の実現を担当する担当者がいるのだ!
まずはPresentationとTransitionで分かれている。
Presentationとは
このDetailsViewControllerが表示されている状態の見た目のこと。
今回の例でいうと、「DetailsViewControllerをスクリーンの下の一部だけに出して、残りの部分は半透明にする」のこと。
コード上は、UIPresentationControllerをimplementしてこの部分を実現する。
Transitionとは
DetailsViewControllerの出し方と閉じる方のこと。
今回の例でいうと、表示するときは下からslide inにして、閉じるときは下にslide outにする。
コード上、UIViewControllerAnimatedTransitioningをimplementして実現する。
Interactive transitionとは
ジェスチャーでtransitionを完成させること。
今回の例でいうと、DetailsViewControllerをドラッグして閉じるのこと。
コード上、UIPercentDrivenInteractiveTransitionみたいなInteractive transition専用のprotocolをimplementして実現する。
「こんなpresentationとtransitionを使うよ〜」のことをどうViewControllerに教える
UIViewControllerTransitioningDelegateを使うのだ!そしてこのprotocolをimplementしてものをDetailsViewController教えればいい。詳細はまた今度。
まとめの図
以上説明した要素の関係をまとめた図。
(ドキュメントからパクッた)

今後のアジェンダ
こんな流れでちょっとずつ書いていく。お楽しみに。
記事のまとめ
iOS Custom Presentation & Transition (1) 〜コード一行もない編〜 - your3i’s blog
iOS Custom Presentation & Transition (2) 〜UIPresentationControllerでカスタムモーダルを作る〜 - your3i’s blog
iOS Custom Presentation & Transition (3) 〜Custom Transition〜 - your3i’s blog
iOS Custom Presentation & Transition (4) 〜Interactive Transition〜 - your3i’s blog
Intrinsic content sizeを使ってtableviewのdynamic heightを対応
Intrinsic content sizeとは
- Auto Layout 機能の一部
- UIViewのintrinsicContentSizeプロパティ
- constraintが設定されてない場合、intrinsicContentSizeが代わりレイアウトの計算に使われる
- UILabel, UIButtonみたいに、Viewのいろんな中身を適切に表示するために必要なサイズのこと
- ほかに参考になれるリンク:
Auto Layout Guide: Views with Intrinsic Content Size
What is a view’s intrinsic content size? - free Swift 4 example code and tips
使い方
UILabel, UIButtonみたいなUIViewのsubclassたちはもうintrinsicContentSizeをいい感じに管理している。でもほかに管理してないsubclassたちもいっぱいある。例えばUITableView。
intrinsicContentSizeをいい感じに対応するために?
もとのビュークラスを継承して、intrinsicContentSizeをoverrideして正しいintrinsicContentSizeを返す。
tableviewのdynamic heightを対応
⬇️を使うことで、tableviewがcontentSizeによって自動で伸びる。そして、必要によって限界値を設定する。
class SelfResizingTableView: UITableView {

    // 限界値プロパティ
    var maxHeight: CGFloat = .greatestFiniteMagnitude

    override var contentSize: CGSize {
        didSet {
            // contentSizeが変わったから
            // invalidateIntrinsicContentSize()を呼び出して、intrinsicContentSizeの再計算をリクエスト
            invalidateIntrinsicContentSize()
        }
    }

    // intrinsicContentSizeを計算
    override var intrinsicContentSize: CGSize {
        let height = min(contentSize.height, maxHeight)
        return CGSize(width: contentSize.width, height: height)
    }
}
まとめ
Intrinsic content sizeを使うと、いろんなビューのruntime dynamic sizeを対応できる。UIStackViewと合わせて使うと、auto layoutの設定がかなり楽になる気がする。
presentingViewControllerとpresentedViewController
はじめに
presentingViewControllerとpresentedViewController、毎回どれがどれってわからなくなるので、今回徹底的に調査しようと。
とりあえず~それぞれの定義
presentingViewController
The view controller that presented this view controller.
Discussion
When you present a view controller modally (either explicitly or implicitly) using the present(_:animated:completion:) method, the view controller that was presented has this property set to the view controller that presented it. If the view controller was not presented modally, but one of its ancestors was, this property contains the view controller that presented the ancestor. If neither the current view controller or any of its ancestors were presented modally, the value in this property is nil.
簡単に翻訳すると>>
モーダルで出したview controllerにとって、presentingViewControllerはこのview controllerを出したview controllerになる。もしview controllerはモーダルで出されたじゃなく、でもこのview controllerの親か(親の親か…先祖)はモーダルで出された場合、このview controllerのpresentingViewControllerはこの先祖のpresentingViewControllerになる。そのほかの場合、nilになる。
presentedViewController
The view controller that is presented by this view controller, or one of its ancestors in the view controller hierarchy.
Discussion
When you present a view controller modally (either explicitly or implicitly) using the present(_:animated:completion:) method, the view controller that called the method has this property set to the view controller that it presented. If the current view controller did not present another view controller modally, the value in this property is nil.
簡単に翻訳すると>>
present(_:animated:completion:) を呼び出す側のpresentedViewControllerはそのモーダルview controllerになる。
presentedViewController は結構わかりやすい気がする。
それでは謎解きタイム
1. presentingViewControllerとpresentedViewControllerの値はいつ設定される(いつ正しく取れる)?
viewDidLoad()のときにはまだ、viewWillAppear()呼ばれた時点で正しく取れた。
2. 各シナリオで、view controllerのpresentingViewControllerとpresentedViewControllerを検証
- A →(present)→ B
| vc | presentingViewController | presentedViewController |
|---|---|---|
| A | nil | B |
| B | A | nil |
- A →(present)→ B →(present)→ C
| vc | presentingViewController | presentedViewController |
|---|---|---|
| A | nil | B |
| B | A | C |
| C | B | nil |
下からは先祖があるパターン
- UINavigationController →(root)→ A →(present)→ B
| vc | presentingViewController | presentedViewController |
|---|---|---|
| UINavigationController | nil | B |
| A | nil | B |
| B | UINavigationController | nil |
- A →(present)→ UINavigationController →(root)→ B →(push)→ C
| vc | presentingViewController | presentedViewController |
|---|---|---|
| A | nil | UINavigationController |
| UINavigationController | A | nil |
| B | A | nil |
| C | A | nil |
- UINavigationController1 →(root)→ A →(present)→ UINavigationController2 →(root)→ B →(push)→ C
| vc | presentingViewController | presentedViewController |
|---|---|---|
| UINavigationController1 | nil | UINavigationController2 |
| A | nil | UINavigationController2 |
| UINavigationController2 | UINavigationController1 | nil |
| B | UINavigationController1 | nil |
| C | UINavigationController1 | nil |
先祖があるパターンからみると、UINavigationControllerの中のview controllerたちはモーダルview controller のこと知ってるけど、モーダルview controllerはUINavigationControllerのことしか知らない。
presentingViewControllerとpresentedViewControllerの関係は多分present(_:animated:completion:) methodで繋がった二つのview controller groupの関係で、一つのview controller groupの中のview controllerはもう一つのview controller groupの一番のparent view controller しか知らない。
Viewの一つの角を角丸にする
こういうViewを作りたく
- 高さ30の長方形
- 左下はサイズ24の角丸

Try CACornerMask (Failed)
iOS11から使えるようになったCACornerMaskを使ってみる。
let view = UIView(frame: CGRect(x: 0, y: 0, width: 60, height: 30))
view.backgroundColor = .cyan
view.layer.cornerRadius = 24
view.layer.maskedCorners = [.layerMinXMaxYCorner]
PlaygroundPage.current.liveView = view
こんな感じになった、ダメそう

Try UIBezierPath Part1(Failed)
CACornerMaskはどうせiOS11以上しか使えないから、あっさり諦めた。
次はUIBezierPathのいつものやり方でやってみる。
let view = UIView(frame: CGRect(x: 0, y: 0, width: 60, height: 30))
view.backgroundColor = .cyan
let path = UIBezierPath(roundedRect: view.bounds, byRoundingCorners: .bottomLeft, cornerRadii: CGSize(width: 24, height: 24))
let mask = CAShapeLayer()
mask.path = path.cgPath
view.layer.mask = mask
PlaygroundPage.current.liveView = view
今回はこんな感じ。良さそうでは?でもよくみたら、角丸のサイズは24じゃなさそう。

init(roundedRect:byRoundingCorners:cornerRadii:)のcornerRadiiを調べてみたら。どうやら長方形の幅か高さかの半分を超えた値を設定すると、自動的に半分にしてもらうらしい。要するに、高さ30の長方形だから、15の角丸にされた。
The radius of each corner oval. Values larger than half the rectangle’s width or height are clamped appropriately to half the width or height.
半分を超えたサイズの角丸はもう角丸じゃなくなったかな。
Try UIBezierPath Part2(Succeeded)
描くしかない…でも角丸はどうやって描くんだ😅
A -> B -> C -> ... -> E -> A 多分こう。

let view = UIView(frame: CGRect(x: 0, y: 0, width: 60, height: 30))
view.backgroundColor = .cyan

// pathを描く
let path = UIBezierPath()
path.move(to: CGPoint(x: 0, y: view.bounds.height - 24))
path.addLine(to: .zero)
path.addLine(to: CGPoint(x: view.bounds.width, y: 0))
path.addLine(to: CGPoint(x: view.bounds.width, y: view.bounds.height))
path.addLine(to: CGPoint(x: 24, y: view.bounds.height))
path.addArc(withCenter: CGPoint(x: 24, y: view.bounds.height - 24), radius: 24, startAngle: CGFloat.pi / 2, endAngle: -(CGFloat.pi / 4), clockwise: true)

let mask = CAShapeLayer()
mask.path = path.cgPath
view.layer.mask = mask
PlaygroundPage.current.liveView = view
いい感じになった。YEAH~

そのあとハマったところ
viewのサイズがruntimeで変わることがある場合(autolayoutで)、maskのサイズは自動的に変わらないから、viewのサイズが変わる度にmaskのサイズを指定し直す必要がある。
viewのサイズ変わること、外から検知できなさそうだから、subclass作るしかなさそう。
最終的に
class LeftBottomRoundCornerView: UIView {
    override init(frame: CGRect) {
        super.init(frame: frame)
        setupMask()
    }
    required init?(coder aDecoder: NSCoder) {
        super.init(coder: aDecoder)
        setupMask()
    }
    override var bounds: CGRect {
        didSet {
            setupMask()
        }
    }
    private func setupMask() {
        let path = UIBezierPath()
        path.move(to: CGPoint(x: 0, y: bounds.height - 24))
        path.addLine(to: .zero)
        path.addLine(to: CGPoint(x: bounds.width, y: 0))
        path.addLine(to: CGPoint(x: bounds.width, y: bounds.height))
        path.addLine(to: CGPoint(x: 24, y: bounds.height))
        path.addArc(withCenter: CGPoint(x: 24, y: bounds.height - 24), radius: 24, startAngle: CGFloat.pi / 2, endAngle: -(CGFloat.pi / 4), clockwise: true)
        let mask = CAShapeLayer()
        mask.path = path.cgPath
        layer.mask = mask
    }
}