iOSでMaterial Designを使いたくない理由
自分はアプリエンジニア。主にiOSだが、Androidもちょっとやってる。
最近担当しているプロジェクトで、UIコンポーネントライブラリーを作ろうとしている。
一週間ちょい続いたんだけど、全然簡単ではなかった。
何にしろ、エンジニアの作業だけではなくて、デザイナーの力も必要だ。
そしたら、Androidのエンジニアに、Material Designを使ったらよくね?って言われた。「やだよ〜」って答えた。
Material Designとは
Material Design はGoogleが作ったデザインシステム。AndroidのコンポーネントライブラリーだけじゃなくてiOSのも提供している。
使いたくない理由
- デザインはiOSぽくない
iOSとAndroidそれぞれはOSのfundamental frameworkの上で作られたエコシステム。それぞれ自分なりの美感を持っている。そしてユーザーはiOSかAndroidを選ぶことで、OSの体験の統一性を体験できるのは当たり前のようなこと。Material Designを使うと、アプリの間の体験が崩れる。Material Designを使ってるアプリを開くと、別OSに乱入したような感じになる。
- 標準UIとMaterial Designの混在ができなさそう
Material Design 2.0 からデザインはiOSに近づいたと聞いたが、まだまだと思う。
ソースコードをみた感じ、コンポーネントは標準のUIコンポーネントから作られてじゃなくて、UIViewから作った感がすごくある。そのため、ほぼオレオレで体験を定義してるように見える。
Material Designを使うこのになると、標準のUIを完全に捨てるしかなさそう。そうしないと、アプリ間だけじゃなくて、アプリ内でも体験の違和感がでるはず。
どんなとき使いたくなる
Material Designは徹底的で完成したデザインシステムに見える。それと比べたらiOSのガイドラインはシンプル。自分たちをデザインシステムを作るとき参考になれると思う。あとは、自分のアプリを作るとき、デザインとかあんまり気にしないなら、これを使えばめっちゃ楽だろう。
(デザイナーではないから、自分の勝手の感想である…)
複数のscroll viewを同時にスクロール
なにそれ
おしゃれなウォークスルーでよくParallax Scrollingぽいデザインを見かける。それを実現するために、複数のscroll viewを使う必要がある。本当に動くの?興味があってやってみた。
画像がないと分からないよ
こんな簡単なものを作ってみた。

作り方
レイアウト

コード
import UIKit

class ViewController: UIViewController {

    @IBOutlet weak var outerScrollView: UIScrollView!
    @IBOutlet weak var bottomScrollView: UIScrollView!
    @IBOutlet weak var topScrollView: UIScrollView!

    override func viewDidLoad() {
        super.viewDidLoad()
    }

    override func viewDidAppear(_ animated: Bool) {
        super.viewDidAppear(animated)

        // To scroll the top scroll view backward,
        // first set the top scroll view scrolled to the right edge
        topScrollView.contentOffset = CGPoint(x: topScrollView.bounds.width, y: 0.0)
    }
}

extension ViewController: UIScrollViewDelegate {

    func scrollViewDidScroll(_ scrollView: UIScrollView) {
        guard scrollView == outerScrollView else {
            return
        }

        // Calculate scroll progress
        let outerScrollDistance = outerScrollView.contentSize.width - outerScrollView.bounds.width
        let progress = scrollView.contentOffset.x / outerScrollDistance

        // Scroll the top scroll view backward programmatically
        let topScrollDistance = topScrollView.contentSize.width - topScrollView.bounds.width
        let topOffsetX = (1 - progress) * topScrollDistance
        topScrollView.contentOffset = CGPoint(x: topOffsetX, y: 0.0)

        // Scroll the bottom scroll view forward programmatically
        let bottomScrollDistance = bottomScrollView.contentSize.width - bottomScrollView.bounds.width
        let bottomOffsetX = progress * bottomScrollDistance
        bottomScrollView.contentOffset = CGPoint(x: bottomOffsetX, y: 0.0)
    }
}
もうちょっと補足
- outer scroll view が trigger として、ほかのscroll view を動かしたいので、outer scroll view だけ、delegateをこのview controllerに設定する
- 全画面のどこでスワイプしてもouter scroll viewを動かすために、top scroll view と bottom scroll viewのscroll enabled と user interaction enabledをOFFにしている
iOS QuickLook like Interactive Transition for Dismissal - Part 1
What is a QuickLook like transition?
QuickLook is a framework used to preview files like images, videos and many other kind of files in iOS SDK.
So many iOS pre-installed apps are using this framework. The most commonly used among them must be the "Photos" app. In the "Photos" app, if you preview a photo and want to dismiss it, you will swipe the photo. ( I think most users barely tap the "Back" button 🤔)
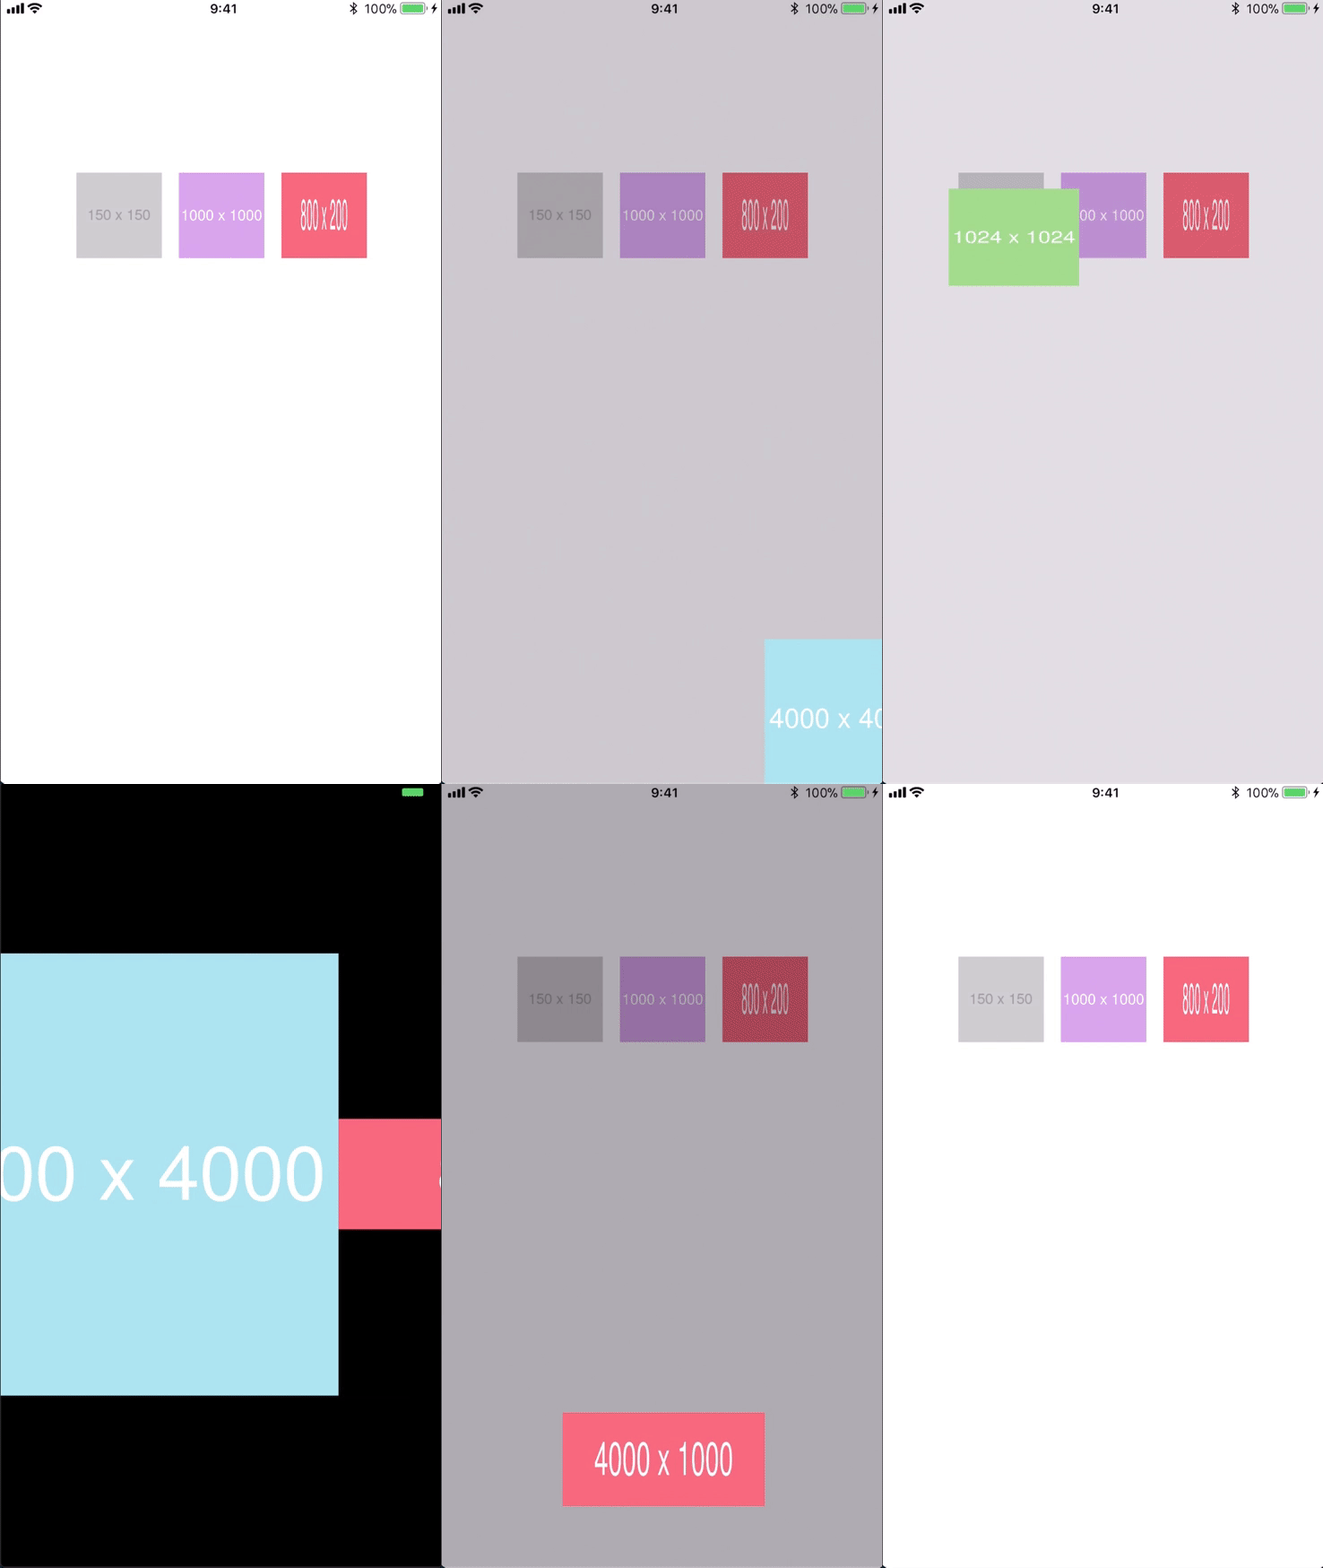
Maybe it's just so natural that you don't even notice what happened. Let's break the transition into small pieces.
When you swipe to dismiss ...
- The image seems to stick to your finger moves
- The image's size changes as your finger moves
- The dimming view's alpha changes as your finger moves
- When you release, the image is animated to the position and size of its thumbnail image in the previous screen or back to its original position and size if the transition is not occurred.
Why I wrote this post
I didn't find anything useful that could help me understand the process. So, hope it might be some help to some others.
Actually it's kinda introduced in WWDC2016 #216. Even though the tutorial is not complete, it had been a great help. Thanks a lot to one of the speakers. There's a moment he accidentally showed some other parts of the code and it helped me figure out what should be done.
Advances in UIKit Animations and Transitions - WWDC 2016 - Videos - Apple Developer
How (the short version)
Before you start
I suppose you understand how to make a custom transition. That means, for example, you know what a transition context is and what a container view is. If you don't, check here to learn more.
What's the difference
... difference between a simple dismissal transition and an interactive dismissal transition.

The secrets of this interactive dismissal transition
If you know how to make a simple custom transition, I guess what would confuse you the most to make an interactive "Photos" app like dismissal transition are these questions... (which confused me the most)
What is the sticking view moving around with your finger?
It's a temporarily created view. It's put into the container view when transition starts. It doesn't belong to any of the view controllers' views.
How does it know what position and what size to animate to as you release your finger?
Since transition context only knows fromViewController's view and toViewController's view, you have to pass these data from outside to the transition controller or whatever should be in charge of this.
Is the "moving around" a part of the transition?
Strictly speaking, it is. The pan gesture triggers the transition so when you're moving around the view, view controllers are in transition. But the "moving around" is not a part of the transition animation. It's used to scrub the transition animation and you can continue the rest of the animation when it's over.
Is the dimming view animation and moved-around view animation (when pan gesture is over) one animation?
No. Actually they are two separate animations. The dimming view animation is the transition animation to scrub. And the moved-around view animation is just another animation that ends precisely as the transition animation ends.
All in all, what we need to do is ...
To prepare the container view to the ⬇︎ state as the transition starts and animate them as we want.

The animations:

How (the detailed version)
I planned to include the detailed version in this post but it would be too long and ... , in that case, no idea when I could complete this post 😇
So check out the repo if you want !
Related files:
- ImageViewerController.swift
- ImageViewerInteractiveTransitionController.swift
- ImageViewerPanTracker.swift
- ImageViewerTransitionDriver.swift
( Hope I could write another post when I figure out how to make it simple and easy to understand)
Androidのconstraint layoutで、画面横サイズ何パーセントのビューに対して最大横幅を指定したいとき
layout_constraintWidth_percent と(android:maxWidth と layout_constraintWidth_max)の併用はできない。guidelineを使って横何パーセントを作ると、layout_constraintWidth_maxが効くようになる。
例えば
以下のように、image view を画面横サイズの60%にし、最大横幅160dpにし、縦横アスヒは1:1で、横真ん中に置き、上から16dp(図に描いてない)のレイアウトにしたい。

guideline を貼る
Guidelineを以下のようにimage viewの左右に貼る。Guidelineたちがimage viewを横サイズの60%になれるように引っ張る。その上で、layout_constraintWidth_maxを設定すると、最大横幅の指定ができる。

コードの方
        <androidx.constraintlayout.widget.ConstraintLayout
            android:layout_width="match_parent"
            android:layout_height="wrap_content">

            <androidx.constraintlayout.widget.Guideline
                android:id="@+id/guideline_imageview_start"
                android:layout_width="wrap_content"
                android:layout_height="wrap_content"
                android:orientation="vertical"
                app:layout_constraintGuide_percent="0.2" />

            <androidx.constraintlayout.widget.Guideline
                android:id="@+id/guideline_imageview_end"
                android:layout_width="wrap_content"
                android:layout_height="wrap_content"
                android:orientation="vertical"
                app:layout_constraintGuide_percent="0.8" />

            <ImageView
                android:layout_width="0dp"
                android:layout_height="0dp"
                android:layout_marginTop="16dp"
                android:contentDescription="@null"
                app:layout_constraintDimensionRatio="H,1:1"
                app:layout_constraintEnd_toStartOf="@id/guideline_imageview_end"
                app:layout_constraintRight_toRightOf="parent"
                app:layout_constraintStart_toEndOf="@id/guideline_imageview_start"
                app:layout_constraintTop_toTopOf="parent"
                app:layout_constraintWidth_max="160dp" />

        </androidx.constraintlayout.widget.ConstraintLayout>
ベタ書きは絶対に悪いではない
最近、アプリのiOS版とAndroid版のスタイル整理のためのカラーパレットの作成を行った。Androidの方が辛いすぎて、以下の感想を得た⬇︎
ベタ書きは絶対悪いではない。
すごい仕組みでも絶対使わないといけないことではない。
すべて状況によって、効率のいい方を選ぶべきである。
ちなみに、自分はAndroidの技術レベルは低い。スタイル整理とかもドキュメントをみつづやる感じだった。理解不足の感想かもしれない。
アプリの状態
今メンテしているアプリは、いままでデザイン側と約束したカラーパレットやコンポーネントライブラリーがなかった。
iOSアプリはスタイル全部そのままIBで作った。(ベタ書きと近い)
そしてAndroidは完全に開発者の気分でfreestyleになってた。styleを作って設定してるところもあって、themeを定義してやってるところもある。さらに、文字色やサイズをデザインと合わせてないところもある。
やったこと
アプリ内使われてる色をデザインと統一するように、名前と値が決めたカラーパレットを作る。今後コンポーネントライブラリーを作るとき便利になるように、これは第一歩。
理想のやり方
① カラーパレットを作る
② 現在コード内適当に定義したカラーパレットを新しいカラーパレットに書き換え
③ 新しい画面やコンポーネントを作るとき、カラーパレットからとるようにする
④ すでに作った画面は、スタイルが崩さなければほって置く(今後必要であればリファクタリング)
なぜ④がいいというと、まずスタイルを全部作り直すのはすごくコストかかる。そして、スタイルは見た目、コードが汚くても見た目が正しいであればたいした負債はないだろう。
現実
カラーパレットを作ることだけで。
| 項目 | iOS | Android |
|---|---|---|
| いままでのスタイル設定し方 | ほとんどIBで設定 | theme, style, スタイル設定してない、ベタ書き混在 |
| 画面ごとにスタイル独立してるか? | YES | NO。theme使ってるから、themeをいじったらいろんな画面に影響を与えた |
| 既存画面のスタイル変化のチェック | NO | YES |
| かかった時間 | 3時間以下 | 3日間以上 |
反省点
違いは既存画面への影響だね。
iOSはベタ書きと近いから、各画面のスタイルが独立している。カラーパレット定義されても、使うかどうか各画面ごとに選択肢があるし、リファクタリングするかどうかも各画面ごとに自由である。現状既存画面になんの影響もないので、全部放置してる。
Androidはthemeを使ってるが、スタイルとカラーパレットに合わせて設定してなかったので、設定する必要がある。そして、ベタ書きが嫌でテキスト色とかちゃんと設定してないから、themeをいじることでいろんな画面に影響を与えた。そういうことで、全部の画面に意図してないスタイルの変化があるかどうかチェックする必要があった。本当に辛くて泣きそうになった😇
結論
カラーパレットやコンポーネントがない状態で、(今後スタイルの整理が行う予定があるとき)、画面ごとのスタイルの独立性が重要だと思う。全部画面のスタイルを内部の仕組みによってリファクタリングするという膨大な無意味な作業を避けれるという利点があるからである。そいうことで、そんな状況でベタ書きが全然いいと思う!
Androidのthemeやthemeのoverrideや、styleや…うまく使うと多分便利でいい仕組みかもが。どうな状況でも、絶対ことを使うべきだよ!ということではないだ!使い方やルールがまだ決めてないとき使うと、ただ今後のリファクタリングするときの影響範囲を広めてるだけだと思う。見えない把握しづらい連続している地雷のように。
まとめると、いいものを使うではなく、ものをうまく使うといいのだ!
QRコードスキャンぽいUIの作り方
ちょっと難しいポイント
- 真ん中の空いてる正方形
- 角丸じゃないけど、4つのあれ
作る
画面のビューの構成
自分がこういう画面を作ったとき、こういう構成にした⬇︎
今回の内容は、mask viewの作り方を説明する。

ScanQRMaskView(この命名はただの例)
ScanQRMaskViewというxibファイルを作成
その中の真ん中にcaptureViewという正方形のviewを置いた。そしてよしなにサイズを決めて、真ん中に配置するようにconstraintをはる。
captureViewを置く目的は、ただ正方形のサイズと位置を把握しやすくにするためである。
ScanQRMaskView.swift で簡単なスタイルセットアップをやる
captureViewのIBOutletを作って、そして以下のように設定。
    private func setupAppearance() {
        // とりあえず背景色全部.clearにする
        backgroundColor = .clear
        captureView.backgroundColor = .clear
        // captureViewに白いボーダーをつける(デザイン通り)
        captureView.layer.borderWidth = 0.5
        captureView.layer.borderColor = UIColor.white.cgColor
    }
drawRectで描画
drawRectでdimming背景、透明の正方形、4つのあれを描画。
    override func draw(_ rect: CGRect) {
        super.draw(rect)
         // dimming背景を描画
        let dimmingColor = UIColor(red: 0, green: 0, blue: 0, alpha: 0.6)
        dimmingColor.setFill()
        UIRectFill(bounds)

         // 透明の正方形を描画
        let captureRect = captureView.frame
        UIColor.clear.setFill()
        UIRectFill(captureRect)

         // 角にある4つのあれをUIBezierPathを使って描画
        let cornerLength: CGFloat = 20.0
        let cornerWidth: CGFloat = 4.0
        let fillColor = UIColor.blue
        let path = UIBezierPath()

         // 左上
        let leftTop = CGPoint(x: captureRect.origin.x, y: captureRect.origin.y)
        path.move(to: leftTop)
        path.addLine(to: CGPoint(x: leftTop.x, y: leftTop.y + cornerLength))
        path.addLine(to: CGPoint(x: leftTop.x + cornerWidth, y: leftTop.y + cornerLength))
        path.addLine(to: CGPoint(x: leftTop.x + cornerWidth, y: leftTop.y + cornerWidth))
        path.addLine(to: CGPoint(x: leftTop.x + cornerLength, y: leftTop.y + cornerWidth))
        path.addLine(to: CGPoint(x: leftTop.x + cornerLength, y: leftTop.y))
        path.close()
        fillColor.setFill()
        path.fill()

         // 右上
        let rightTop = CGPoint(x: captureRect.origin.x + captureRect.width, y: captureRect.origin.y)
        path.move(to: rightTop)
        path.addLine(to: CGPoint(x: rightTop.x - cornerLength, y: rightTop.y))
        path.addLine(to: CGPoint(x: rightTop.x - cornerLength, y: rightTop.y + cornerWidth))
        path.addLine(to: CGPoint(x: rightTop.x - cornerWidth, y: rightTop.y + cornerWidth))
        path.addLine(to: CGPoint(x: rightTop.x - cornerWidth, y: rightTop.y + cornerLength))
        path.addLine(to: CGPoint(x: rightTop.x, y: rightTop.y + cornerLength))
        path.close()
        fillColor.setFill()
        path.fill()

         // 右下
        let rightBottom = CGPoint(x: captureRect.origin.x + captureRect.width, y: captureRect.origin.y + captureRect.height)
        path.move(to: rightBottom)
        path.addLine(to: CGPoint(x: rightBottom.x, y: rightBottom.y - cornerLength))
        path.addLine(to: CGPoint(x: rightBottom.x - cornerWidth, y: rightBottom.y - cornerLength))
        path.addLine(to: CGPoint(x: rightBottom.x - cornerWidth, y: rightBottom.y - cornerWidth))
        path.addLine(to: CGPoint(x: rightBottom.x - cornerLength, y: rightBottom.y - cornerWidth))
        path.addLine(to: CGPoint(x: rightBottom.x - cornerLength, y: rightBottom.y))
        path.close()
        fillColor.setFill()
        path.fill()

         // 左下
        let leftBottom = CGPoint(x: captureRect.origin.x, y: captureRect.origin.y + captureRect.height)
        path.move(to: leftBottom)
        path.addLine(to: CGPoint(x: leftBottom.x, y: leftBottom.y - cornerLength))
        path.addLine(to: CGPoint(x: leftBottom.x + cornerWidth, y: leftBottom.y - cornerLength))
        path.addLine(to: CGPoint(x: leftBottom.x + cornerWidth, y: leftBottom.y - cornerWidth))
        path.addLine(to: CGPoint(x: leftBottom.x + cornerLength, y: leftBottom.y - cornerWidth))
        path.addLine(to: CGPoint(x: leftBottom.x + cornerLength, y: leftBottom.y))
        path.close()
        fillColor.setFill()
        path.fill()
    }
おわりに
captureViewを用意するのほかの理由は:
- AutoLayoutで各画面サイズと回転を簡単に対応できる
- 簡単に、QRCodeスキャンのcontroller側に、スキャンできる領域を伝えることができる
- 正方形のレイアウトのコード書きたくない
iOS Custom Presentation & Transition (4) 〜Interactive Transition〜
はじめに
いよいよラストになった!!ついつい長引いちゃった。
一応頭の方で説明した方がいいかな。
この記事の内容は以下の記事と繋いている、そして今回はPart4でラストだ。
iOS Custom Presentation & Transition (1) 〜コード一行もない編〜 - your3i’s blog
iOS Custom Presentation & Transition (2) 〜UIPresentationControllerでカスタムモーダルを作る〜 - your3i’s blog
iOS Custom Presentation & Transition (3) 〜Custom Transition〜 - your3i’s blog
前回までは
前回までは、dismissするときのアニメーションをカスタマイズしたところまでだった。そのカスタマイズは今回のinteractive transitionのために必要で、ときにdismiss transitionの見た目は変えてない。

今回の目標は
今回の目標は、dismissするとき、detailsViewController(緑のview)をdrag gestureで閉じれるようにする。
UIPercentDrivenInteractiveTransition
Yeah! これを使って実現する。
UIPercentDrivenInteractiveTransitionプロトコルの役割はtransitionなんパーセント進んだのかの報告やinteractive transitionを完成するかどうかのコントロールだ。
これをadoptするクラスは論理上なんでもよくて、UIViewControllerTransitioningDelegateで返してあげれば問題なし。要するに、DetailsViewController自分でadoptしてもできる。でも今回はinteractorになるCustomDismissInteractorというクラスを作った。
CustomDismissInteractorクラスの作成
とりあえずまずCustomDismissInteractorクラスを作る。
final class CustomDismissInteractor: UIPercentDrivenInteractiveTransition {
// まだ空っぽ
}
UIViewControllerTransitioningDelegateで返す。DetailsViewControllerの中:
class DetailsViewController: UIViewController, UIViewControllerTransitioningDelegate {

    private var interactor: CustomDismissInteractor!

...

    override func viewDidLoad() {
        super.viewDidLoad()
        // ここでinteractorを作って保存しておく
        interactor = CustomDismissInteractor()
    }

...

    // MARK: - UIViewControllerTransitioningDelegate

    func presentationController(forPresented presented: UIViewController, presenting: UIViewController?, source: UIViewController) -> UIPresentationController? {
        return CustomPresentationController(presentedViewController: presented, presenting: presenting)
    }

    func animationController(forDismissed dismissed: UIViewController) -> UIViewControllerAnimatedTransitioning? {
        return CustomDismissAnimator()
    }

    func interactionControllerForDismissal(using animator: UIViewControllerAnimatedTransitioning) -> UIViewControllerInteractiveTransitioning? {
        // viewDidLoadで作ったinteractorを返す
        return interactor
    }
}
注意:interactorはなんでviewDidLoadで作らなきゃいけないだろう?interactionControllerForDismissalが呼ばれるたびに作ると、作られたinteractorが誰でもretainしなくて、メソッド完了時点ですぐクリアされる。transitionの進捗も、わかる人いなくなったということだ。だから、detailsViewControllerがinteractorをもつ必要がある。
gesture recognizerをセットアップする前の準備
今回はやることをCustomDismissInteractorに寄せたいので、presentedControllerとどのviewにgestureを追加するのか、をCustomDismissInteractorに渡す。
CustomDismissInteractorに
    private var interactiveView: UIView!

    private var presented: UIViewController!

    static func instance(_ presented: UIViewController, panOnView view: UIView) -> CustomDismissInteractor {
        let interactor = CustomDismissInteractor()
        interactor.interactiveView = view
        interactor.presented = presented
        return interactor
    }
そしたら、DetailsViewControllerでのinteractorのinit方法もこっちに変える:
    override func viewDidLoad() {
        super.viewDidLoad()
        interactor = CustomDismissInteractor.instance(self, panOnView: view)
    }
UIPanGestureRecognizerをセットアップ
drag dismissはUIPanGestureRecognizerで実現する。CustomDismissInteractorにgestureを追加するviewを渡したので、その中でgestureのセットアップをやる。
    static func instance(_ presented: UIViewController, panOnView view: UIView) -> CustomDismissInteractor {
        let interactor = CustomDismissInteractor()
        interactor.interactiveView = view
        interactor.presented = presented
        // setupのメソッドを呼び出す
        interactor.setupPanGesture()
        return interactor
    }

    private func setupPanGesture() {
        let panGesture = UIPanGestureRecognizer(target: self, action: #selector(handlePan(_:)))
        panGesture.maximumNumberOfTouches = 1
        interactiveView.addGestureRecognizer(panGesture)
    }

    @objc func handlePan(_ sender: UIPanGestureRecognizer) {
        // 次のステップで
    }
こうして、detailsViewControllerのviewにpan gesture recognizerを追加した。
UIPanGestureRecognizerのハンドリング
    @objc func handlePan(_ sender: UIPanGestureRecognizer) {
        // 0.4パーセント以上完成したらinteractive transition portionを終了
        let threshold: CGFloat = 0.4

        switch sender.state {
        case .began:
            // gestureのstart pointのを設定
            sender.setTranslation(.zero, in: interactiveView)
            // dismiss transitionをスタート(呼ばないとdismiss始まらない)
            presented.dismiss(animated: true, completion: nil)
        case .changed:
            // 進捗pointをとる
            let translation = sender.translation(in: interactiveView)

            guard translation.y >= 0 else {
                // 上にドラッグできなようにしたいから、上にpan gestureが移動したらとにかく.zeroとして認識
                sender.setTranslation(.zero, in: interactiveView)
                return
            }

            // パーセンテージを計算
            let percentage = abs(translation.y / interactiveView.bounds.height)
            update(percentage)
        case .ended:
            // pan gestureが終了下から、ここはtransitionを完成するかどうかの判断
            if percentComplete >= threshold {
                finish()
                // 完成するなら、pan gesture recognizerをremove
                interactiveView.removeGestureRecognizer(sender)
            } else {
                cancel()
            }
        case .cancelled, .failed:
            // pan gesture が正しく完了してない場合、transitionをキャンセル
            cancel()
        default:
            break
        }
    }
挙動をみる:

drag dismiss できた!!!
でも通常のボタンタップしてdismissするのがこけてる!!
なぜだ!!!!
interactive dismiss と normal dismiss の区別
前のステップで、通常のdismissが動かなくなった原因は:
通常のdismissするときも、animator側(前回の記事を参照)が、これはただのtransitionなのか、それともinteractive transitionなのか、わからないので、UIViewControllerTransitioningDelegateのinteractionControllerForDismissalをとにかく読んでるらしい。今はinteractorを返してるから、interactive transitionだとみられたらしく、アニメーションがはじまらない。
色々書いてて、要するに、ボタンタップからのdismissなのかそれともgesture からはじまったdismiss なのかの判断は、UIViewControllerTransitioningDelegateのinteractionControllerForDismissalの返してる値がnilかどうかによるのだ。
DetailsViewControllerで、interactorがin progessのときだけ、interactorを返すように。
    func interactionControllerForDismissal(using animator: UIViewControllerAnimatedTransitioning) -> UIViewControllerInteractiveTransitioning? {
        guard interactor.interactionInProgress else {
            return nil
        }
        return interactor
    }
interactorのinteractionInProgressプロパティがまだないから、追加:
final class CustomDismissInteractor: UIPercentDrivenInteractiveTransition {

...

private(set) var interactionInProgress = false

...

    @objc func handlePan(_ sender: UIPanGestureRecognizer) {
        let threshold: CGFloat = 0.4

        switch sender.state {
        case .began:
            // interactive transition portion start
            interactionInProgress = true
            sender.setTranslation(.zero, in: interactiveView)
            presented.dismiss(animated: true, completion: nil)
        case .changed:
            let translation = sender.translation(in: interactiveView)
            guard translation.y >= 0 else {
                sender.setTranslation(.zero, in: interactiveView)
                return
            }

            let percentage = abs(translation.y / interactiveView.bounds.height)
            update(percentage)
        case .ended:
            if percentComplete >= threshold {
                finish()
                interactiveView.removeGestureRecognizer(sender)
            } else {
                cancel()
            }
            // interactive transition portion end
            interactionInProgress = false
        case .cancelled, .failed:
            cancel()
            // interactive transition portion end
            interactionInProgress = false
        default:
            // interactive transition portion end
            interactionInProgress = false
        }
    }
}
完成!

おわりに
やっと終わった〜
実装も記事を書くのも長かった。
実はまだ細かい改善できるところ書いでないが、まぁいいや、時間があるとき改善編を書こう。
記事のまとめ
iOS Custom Presentation & Transition (1) 〜コード一行もない編〜 - your3i’s blog
iOS Custom Presentation & Transition (2) 〜UIPresentationControllerでカスタムモーダルを作る〜 - your3i’s blog
iOS Custom Presentation & Transition (3) 〜Custom Transition〜 - your3i’s blog
iOS Custom Presentation & Transition (4) 〜Interactive Transition〜 - your3i’s blog

